There is a limit, and it is yours
Every lifter has a point where more training stops paying for itself. Not because extra work does nothing, but because you can only recover from so much of it before the quality of everything else starts to slide.
That point has a name in the training literature: your maximum recoverable volume, or MRV. It is the most work a muscle can take in a week and still come back for more the following week. Stimuli estimates yours, tracks it as it moves, and shows it next to what you actually did.
The three landmarks
Weekly volume isn’t one threshold, it’s a scale with three well-known markers on it. Each one answers a different question about a muscle’s week.
The thing to hold on to is that none of the three are fixed. They move as you gain experience, and they move with your life. A number that was your limit last year may be a comfortable week now, and a stressful month can pull all three down at once.
What “recoverable” really means
Here is the part worth being honest about, because it is usually oversold. The research on training volume is fairly consistent that doing more keeps adding growth, with steadily smaller returns as the pile gets higher. Nobody has pinned down an amount at which muscle growth simply stops or reverses.
So MRV is not the point where extra sets do nothing. It is a fatigue limit, not a growth limit: the most you can keep absorbing without your training falling apart underneath you. A better way to hold it in your head is that it marks where extra work stops paying for the recovery it costs, rather than a wall that hurts you the moment you touch it.
Researchers have tested this fairly directly. In one study lifters trained one leg at roughly double the weekly work of the other for two months. Both legs grew the same. The bigger dose neither hurt them nor helped them, which is not what you would expect if a hard limit were sitting nearby.
That distinction matters because it tells you what to watch. The sign that you have gone past what you recover from is not soreness and it is not a set count. It is performance. When you can no longer match what you did the week before, despite resting normally, that is the signal the research actually uses to define overreaching.
Soreness is a poor messenger
It is tempting to read soreness as the meter. It isn’t one. When researchers gave people wildly different doses of damaging work, the amount of damage differed clearly while how sore they felt barely did. You can be wrecked after a modest session and walk away fresh from a brutal one.
Feeling beaten up is also not proof you overdid it. In one deliberately punishing week, lifters felt their worst partway through and their strength was higher than before once they had recovered. That is training working, not training breaking you.
So when the check-in asks how a muscle feels, the useful question to answer is not “how sore am I” but “how ready is this muscle to work hard today.” That is the version that actually predicts how your session will go.
What actually costs you
Two things drive the recovery bill more than anything else you control in the gym. Both of them change what your week costs you rather than moving either of the two top lines.
And the biggest movers of all sit outside the gym. Sleep and life stress change how much you can absorb more than most training decisions do. Stimuli can’t see either of them directly, which is another reason your own check-in answers matter: they are how that information reaches the estimate at all.
Two readings, and why you need both
You have one recovery budget, and only two ways to spend it: more sets, or better sets. Counting sets alone cannot tell those apart, and neither can counting Effective Work alone. So Stimuli reads your recoverable volume two ways, and the two tabs exist to tell you which of the two levers is actually holding you back.
Taken together they are your recoverable volume. That is why the two sit under one heading rather than being two separate charts: sets on their own are not volume, and Effective Work on its own is not volume either.
Do more of the same training and both readings climb together, because you are simply spending more of one budget. So when the two disagree, that difference can only be coming from how you train your sets, and that is the part worth acting on.
The second case catches two habits that look nothing alike. Long, easy sets taken well short of failure cost little but earn less. And very heavy sets for very few reps are the worst of the lot: they cost the most recovery of anything you can do and hand back some of the least growth, because almost none of their reps are the hard ones that build muscle. Neither is visible if you only count sets.
Behind both tabs sits a single reading of how much recovery your week actually spent, and it is the same for both, because you only have one recovery state to be in. It is the one part of this that takes account of what each individual set cost you rather than just how many you did, and it works from your very first week, before the chart knows anything about you.
Some lifts ask more of a muscle than others for the same count on the page. Loading a muscle where it is long and stretched leaves more to repair afterwards, and so does a set that goes on for a long time. Stimuli takes that into account when it works out how recovered you are, which is why two weeks with the same number of sets can read differently.
How Stimuli works out yours
It starts from published landmarks, scaled to your training experience, because that is the best guess available for a lifter it knows nothing about yet. Then it listens to you, and moves.
Both signals are treated with suspicion, on purpose. A single unusual answer barely moves anything, and the estimate is held close to the published landmarks until a pattern is genuinely there. You should expect it to drift over weeks, not jump around week to week.
Reading the chart
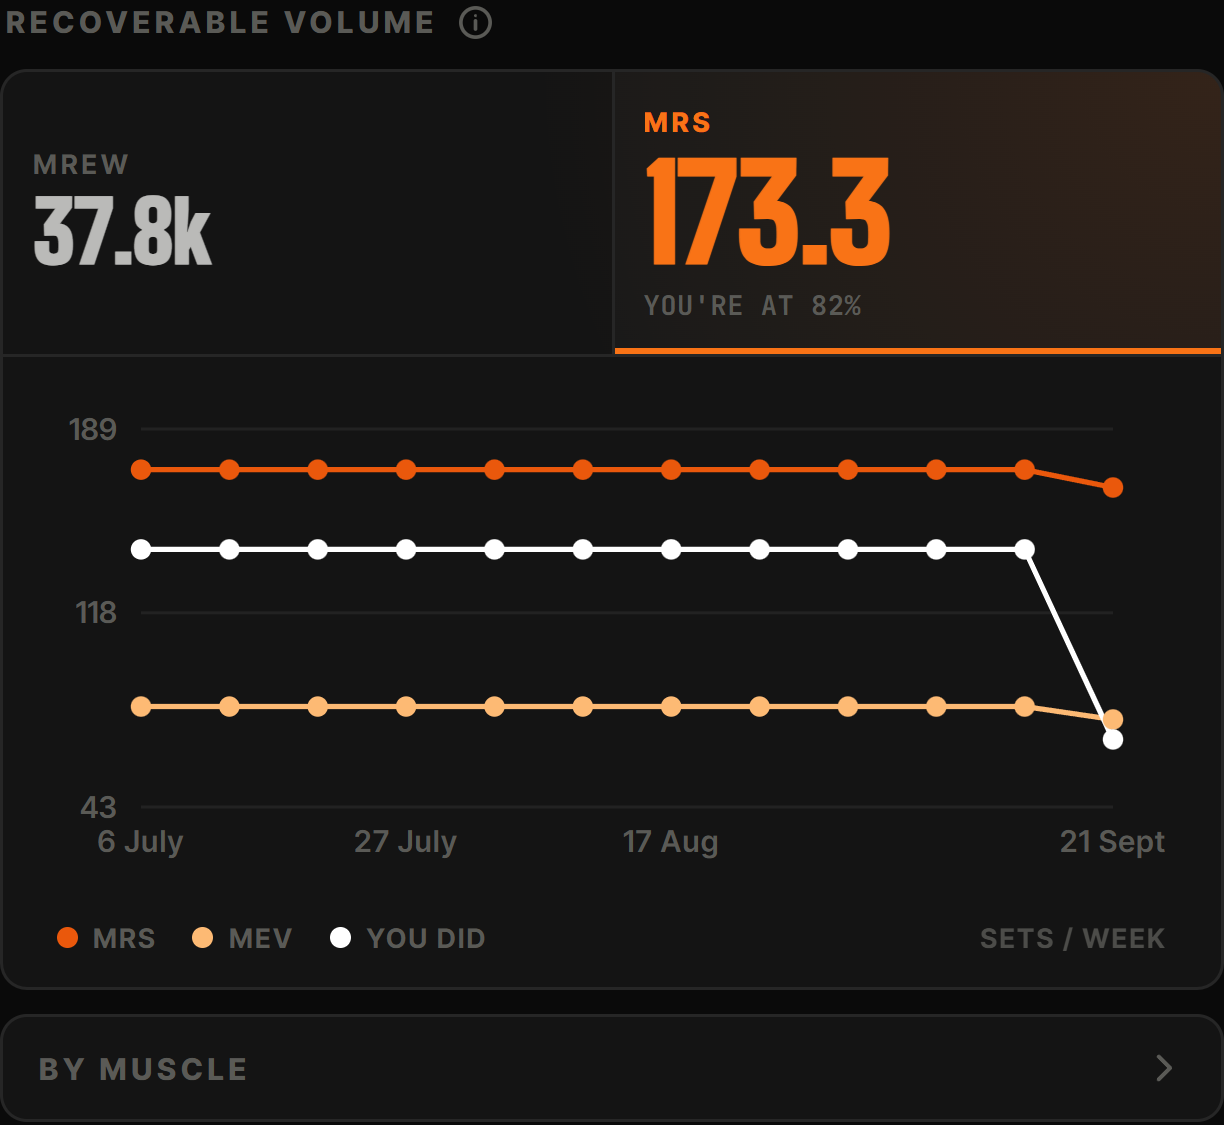
Each week gets three dots, joined so you can follow each line across the weeks.
Both orange lines describe the single muscle named under the chart: the one your training runs out of room on first. Drawing its range as a whole-week total is what lets all three lines share a scale.
The space between them is where you want to live: enough work to be growing, not so much that the muscle carrying the most of it stops recovering. Sitting under the lower line for weeks is the more common mistake, and the easier one to fix.
The lines join one weekly reading to the next so each series is easy to follow. They don’t claim to know anything about the days in between. Each dot is its own estimate, made from the evidence available at the end of that week.
Both orange lines belong to one muscle: the one your training runs out of room on first. That muscle is your limit, because it is the one that will break down first if you add work everywhere. The whole-body number is worked out from it, using the shape of your recent training rather than any single week, so a light week or a holiday moves what you did without moving your recoverable volume. Change the shape of your programme, though, and it follows: pour everything into one muscle and the total you can recover from comes down, because that muscle reaches its limit long before the rest of you does.
Muscle by muscle
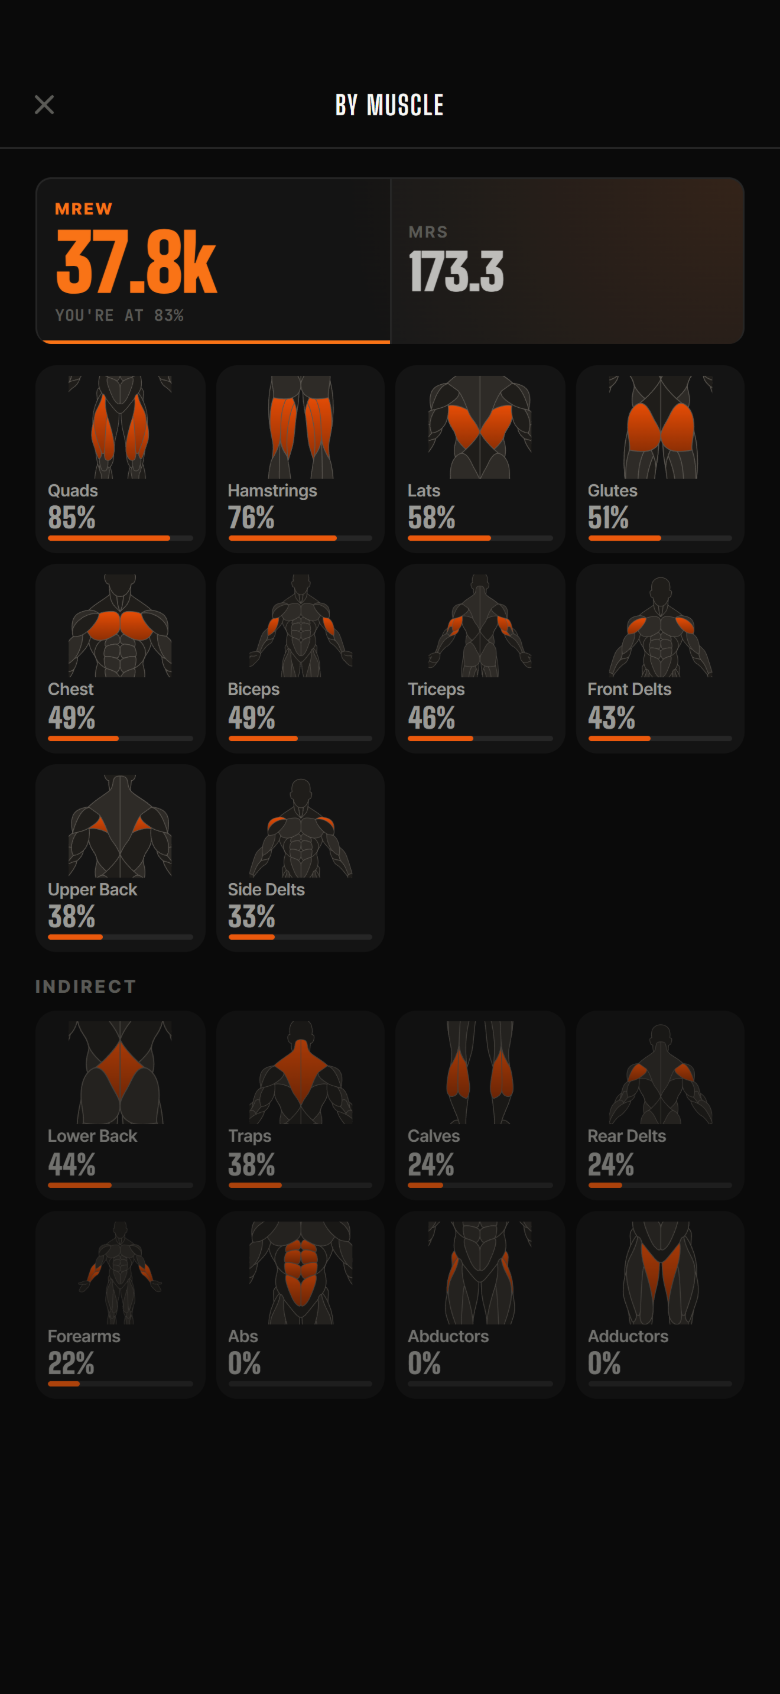
Under the chart, tap By muscle. Every muscle is laid out at once, each with how close it is sitting to its own limit, ranked so the one holding you back is first. Tap any of them for its own chart: the same three lines, but for that muscle alone.
That page is worth trusting a little more than the headline above it. The whole-body number has to guess how your sets are spread across muscles to turn one muscle’s limit into a total for the week. A single muscle needs no such guess: what it did and what it can take are compared directly.
The eight muscles listed as indirect are the ones nobody programmes on purpose. They pick up their work from the compounds that pass through them, so they are shown for completeness, and they never set your whole-body number.
What to do with it
Don’t treat the top line as a target. Living at your limit is how a training block ends, not how it should run. The useful pattern is the one good programs have always used: start a block on the low side, add work as you go, and let the top line tell you how much room is left before you get there.
Sitting far below the line for months is worth noticing too. Plenty of headroom and no progress usually means the answer is more work, not more recovery.
A week spent above the line is not a mistake to correct. Deliberately overreaching for a couple of weeks is a normal part of hard training and often leaves you stronger once you ease off. What a run of weeks up there should do is make you pay attention to your lifts, because that is where the real answer lives.
An estimate, not a measurement
Nothing here is measured from your body. There is no blood test, no scan, no direct reading of how much training you can take. It is an informed estimate built from published landmarks, your own reports and your own performance, and it is only as good as what you feed it.
That is also why the chart says what it knows and no more. Until you have given it enough check-ins to have an opinion about you specifically, it tells you so, and the line it draws is the published one rather than a guess dressed up as yours.
Be especially careful with the idea that you are simply built for more or less volume than other people. Lifters do respond very differently to identical training, but when researchers ran the same people through the same comparison twice, who did better on more volume did not hold up the second time. Your recoverable volume here is a working estimate that sharpens with evidence, not a fact about your body.
Treat the line as a guide with a wide margin either side. The trend it draws over months is far more trustworthy than any single week’s dot, and how your lifts are actually going always wins the argument.
Train with intent
Stimuli learns how much work you recover from, then shows you how much room you have left.